# Emory Pro - Digital Inspection App

A proven digital inspection application for businesses looking to improve their inspection processes.

[Emory Pro ](https://emory.pro/)is a platform for creating digital inspection reports, a game-changer for businesses streamlining their processes beyond traditional paper-based inspections.\
Paper reports often bring challenges such as time-consuming data entry, storage issues, lost or damaged records, and difficulties in analyzing inspection data. <br>

We digitize and automate the whole process, where you can scan, markup, add pictures & videos, complete the check report, and get your deliverables in seconds. These reports can be completed on mobile devices, allowing inspectors to capture data on-site and upload it to the cloud in real-time. This not only saves time but also ensures that inspection data is accurate and up-to-date, thus making Emory an essential tool for modern businesses.

You can also set up automations to send [digital check reports](https://www.webapp.emory.pro/cr/c195749940fb7d3c) to stakeholders such as warehouse managers, customs office or the clients through Emory's powerful API.

Emory Pro is *the* tool for businesses looking to streamline their inspection processes, improve data accuracy, keep stakeholders in the loop, and make data-driven decisions. Take your business to the next level by setting up your Emory Pro account and creating [digital inspection reports](https://www.webapp.emory.pro/cr/c195749940fb7d3c).

{% embed url="<https://www.emory.pro/>" %}

<br>


# How it works

Emory Pro makes it easier for all your team members to work through the journey of creating check reports and digital inspection reports.

An app that is consistent across iOS, Android and Web, Emory Pro works perfectly with mobiles, tablets, laptops, and desktops.  This flexibility makes it one of the most reliable [digital vehicle inspection](https://emory.pro/) app for both field agents and admins.<br>

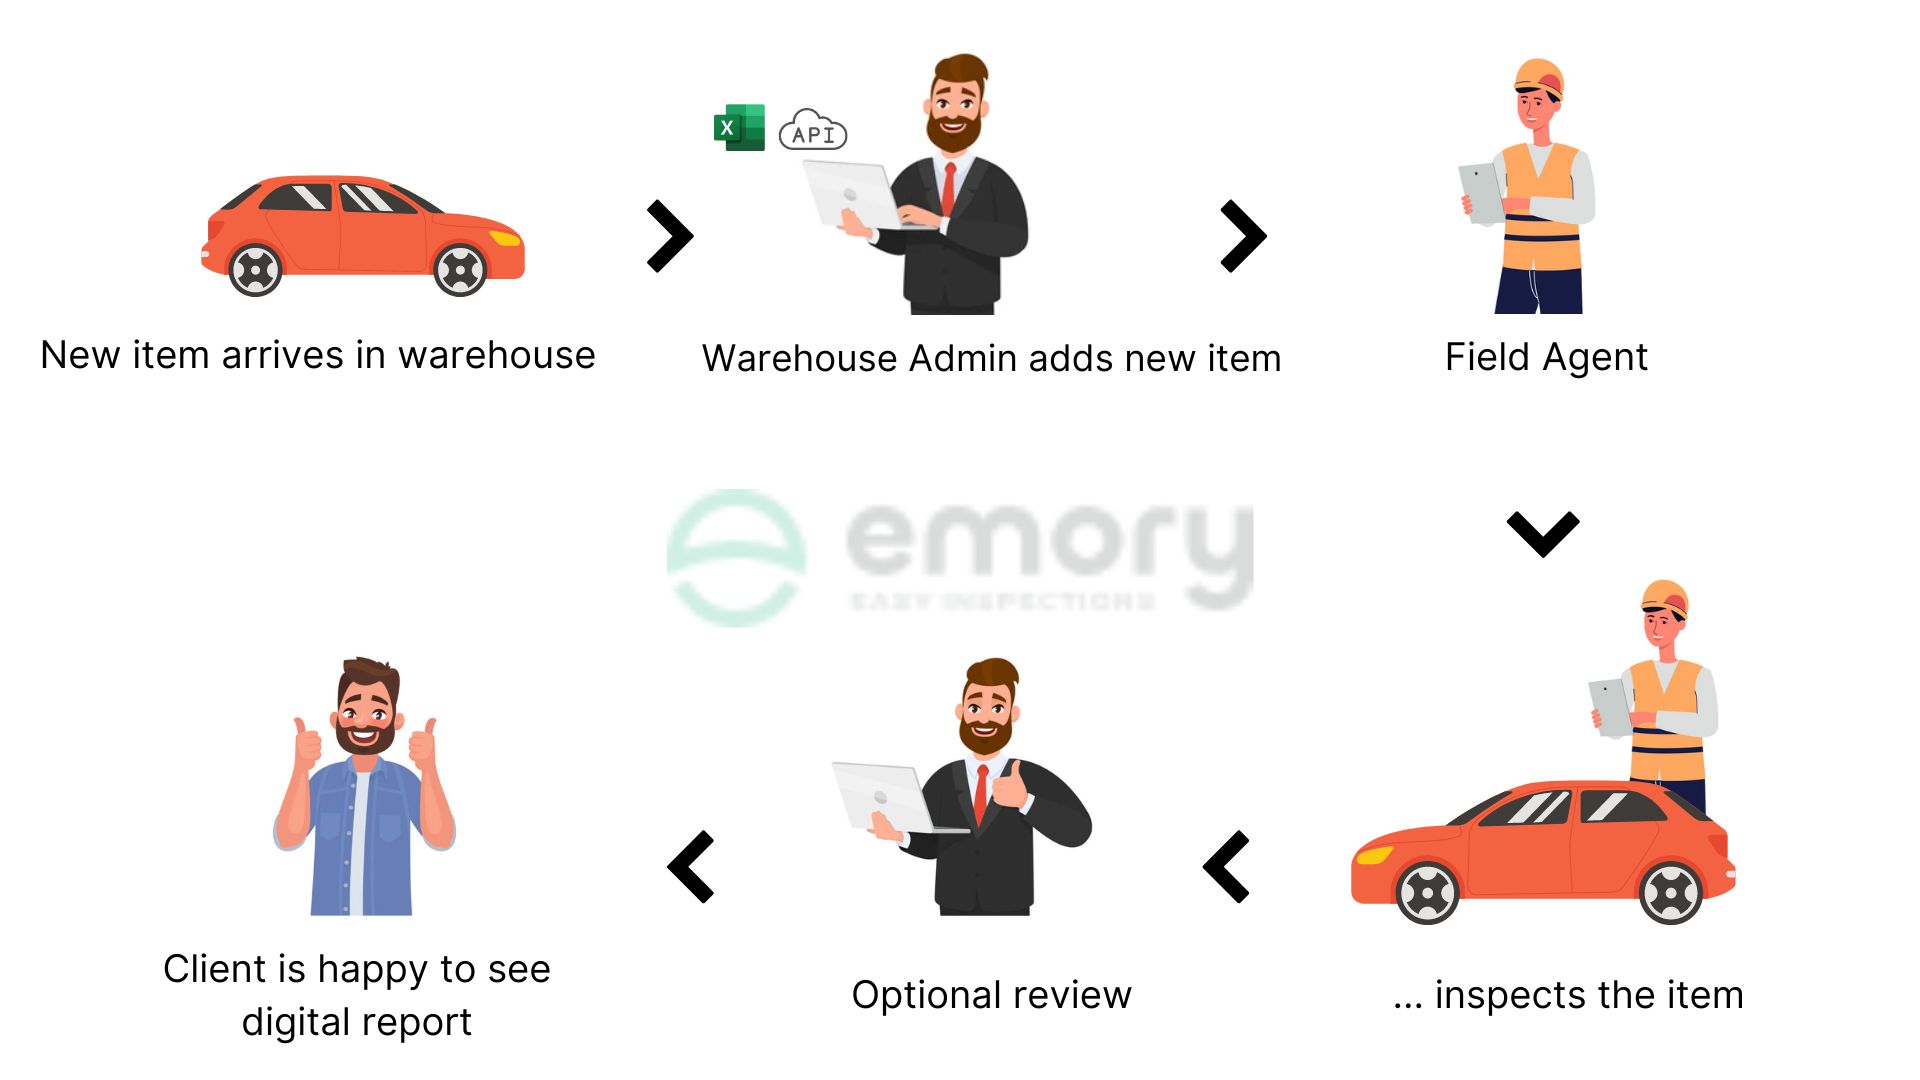
The organization admin or warehouse admin can access the [features](https://emory.pro/features/) via [web app](https://www.webapp.emory.pro/dashboard) to add items with their layouts, create items, and assign them to field agents for generating inspection reports.

The field agent can inspect items, create a digital check report on the mobile app- iOS/Android, and instantly share the inspection report with the customer as a shareable link.&#x20;

[Mobile App for iOS](https://apps.apple.com/de/app/emory-pro/id6443503759)

[Mobile app for Android](https://play.google.com/store/apps/details?id=pro.emory.inspections\&gl=DE)

If required, the inspection report can also be further edited by the warehouse agent or organization admin, ensuring better quality control.

Follow through the rest of the documentation to set up your account and start using Emory Pro for  day-to-day operations.&#x20;


# Roles - Overview

An overview of how different roles interact within Emory Pro app and how their responsibilities fit into daily workflow & activities.

### Users Roles & Responsibilities

<figure><img src="/files/40Yuxyxgc5EuZC7OTxs3" alt=""><figcaption></figcaption></figure>

### Workflow & daily operations with Emory Pro &#x20;

<figure><img src="/files/qS6VQtSxM1sj3VJGJ2Cz" alt=""><figcaption></figcaption></figure>


# What are inspection reports?

Inspection reports are documents that provide a detailed account of an inspection or an audit of a specific item. In Emory Pro, these are created as [digital check reports](https://emory.pro/) that are easy to generate, share, and manage across devices.

\
These reports may include:

* The purpose of the inspection
* The date and time of the inspection
* The names and roles of those involved in the inspection
* A description of the area or equipment inspected
* Photos, videos, comments, and other relevant documents related to the inspection
* Any deficiencies or non-compliances identified
* Recommendations or corrective actions required
* Any follow-up actions needed
* The date and signature of the inspector or auditor.

## Where are Inspection Reports used?

\
Inspection Reports can be used in a variety of settings, such as logistics, automotive, manufacturing, construction, healthcare, and food service.&#x20;

These reports are often used to ensure compliance with regulations, mitigate risks, and keep customers informed through real-time updates.\
\
For example, our vehicle inspection app helps fleet managers document and share car inspection reports instantly with their clients.<br>

## Why are Digital Reports Important?

Overall, inspection reports serve as an important tool for organizations to monitor and improve their operations/ maintain quality, and ensure that they are meeting regulatory requirements and industry standards. A digital inspection process streamlines reporting and reduces human error.

**Sample Digital Inspection Report:** [**View Example**](https://www.webapp.emory.pro/cr/c195749940fb7d3c)

{% file src="/files/ZVBKVgzyKeOuoEiUna9K" %}


# Workflow

<figure><img src="/files/VyfOFxfHp56evsER770t" alt=""><figcaption></figcaption></figure>


# Setting up your Emory account

This guide explains how to set up your account initially as a Super Admin or Organization Admin in the Emory Pro digital inspection app.

### What is a company's account?

Your company account is the primary account from where all operations will take place. It is handled by the designated organization admin, who has full access and can configure Emory for team-wide use.

### How to set up the account?

The first step is creating your organization account. Once you sign up for Emory, you will receive a login invite to your registered email. Use this invite to log in and set up your password. It's important to choose a strong, unique password to keep your account secure.

After successfully logging into your account here - [ Emory Web App Login](https://www.webapp.emory.pro/login)

You can log in here:[ Emory Web App Login](https://www.webapp.emory.pro/login)

#### Steps to Complete Your Account Setup

**STEP 1:** [Organization settings](/setting-up-your-emory-account/organisation-settings)

**STEP 2:** [Adding team members & assigning them roles](/setting-up-your-emory-account/members)

**STEP 3:** [Setting up data pipelines](/operational-settings) - Bulk upload containers/items, signature fields etc.

These details are usually added during the first setup or when an upgrade is required.

\
Continue to the next pages in this documentation to learn how to configure organization settings in detail.


# Organisation settings

Add your company's details

Go to the left side of the dashboard, and click on "Organisation settings" as shown below. You can fill in all the details for each sub-sections.&#x20;

<figure><img src="/files/GS1ybS8dBrnz2L6cFqjS" alt=""><figcaption></figcaption></figure>


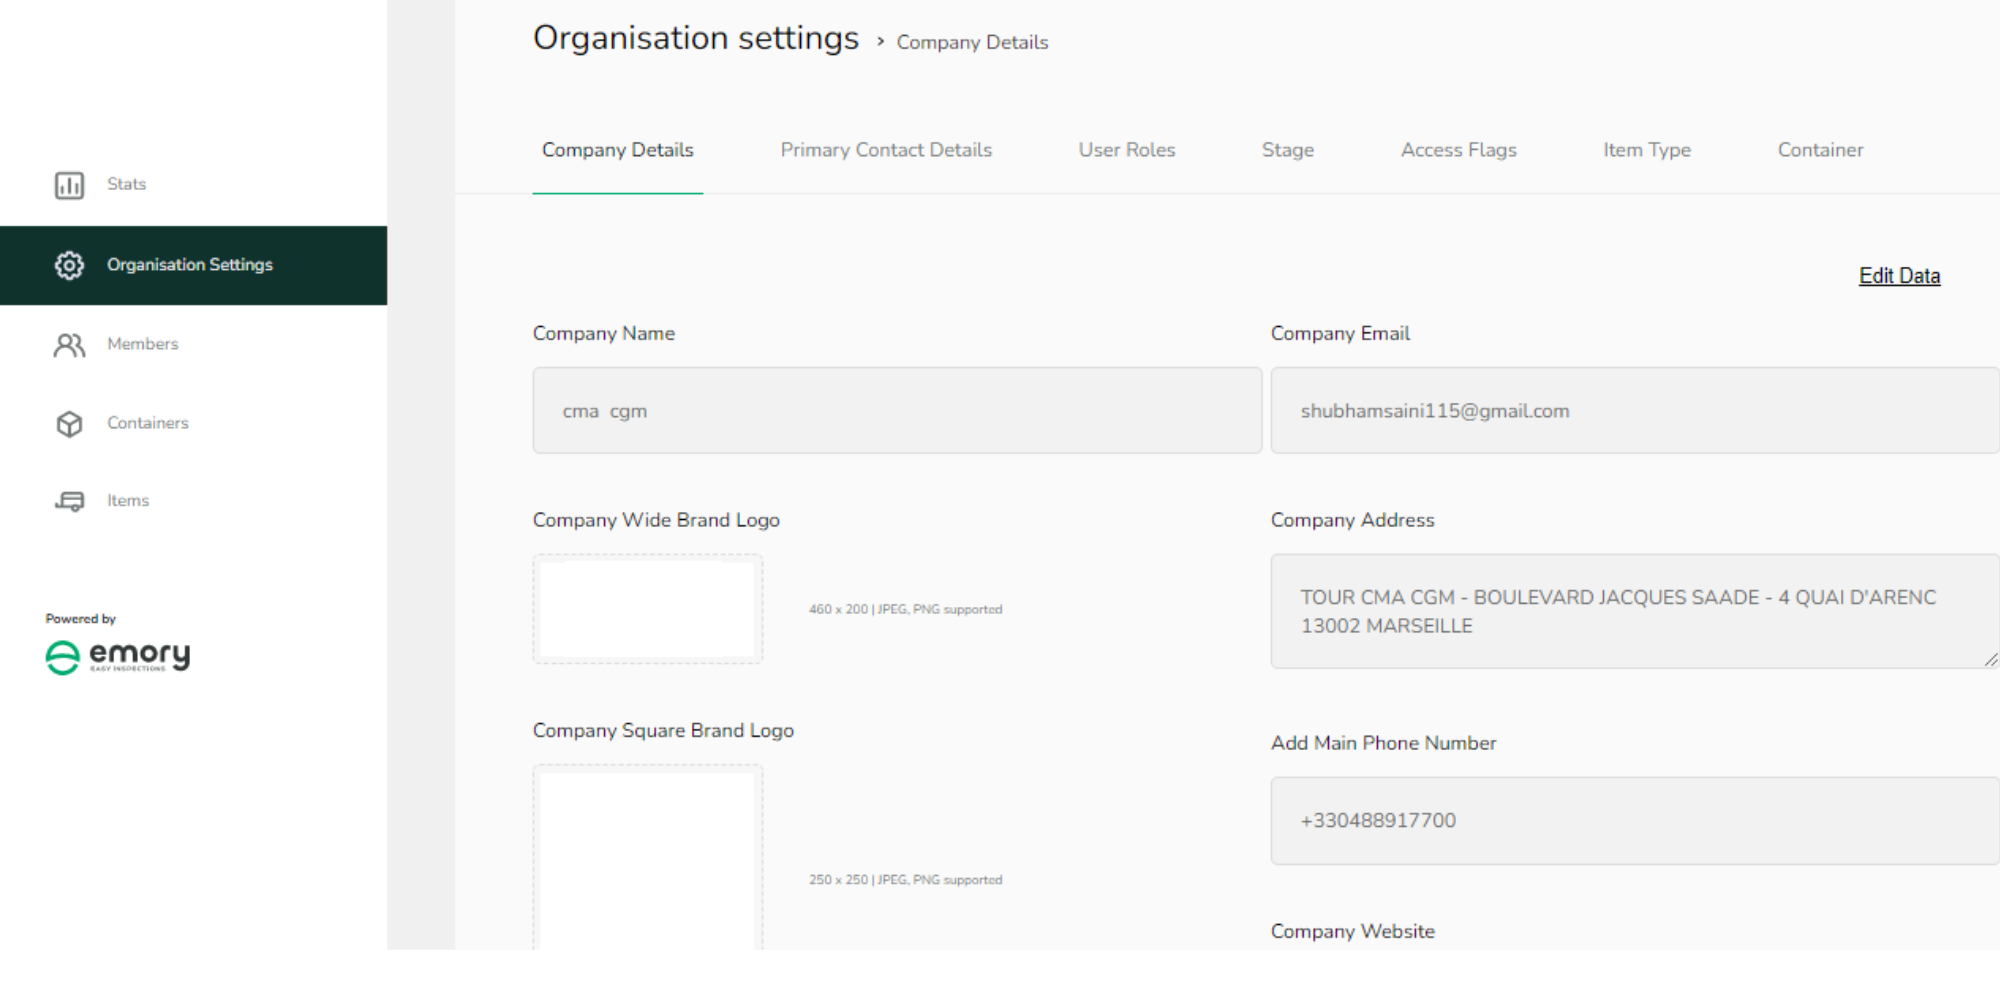
# Company's details

#### 1) Click on " Company Details".

<figure><img src="/files/atXN4ibog6tBmMr5cJH7" alt=""><figcaption></figcaption></figure>

<table><thead><tr><th width="213">Field Name</th><th width="125">Mandatory</th><th width="118">Optional</th><th>Description</th></tr></thead><tbody><tr><td>Company Name</td><td>       ✓</td><td></td><td></td></tr><tr><td>Company wide brand Logo</td><td></td><td>       ✓</td><td></td></tr><tr><td>Company square brand logo</td><td></td><td>       ✓</td><td></td></tr><tr><td>Company type</td><td></td><td>       ✓</td><td></td></tr><tr><td>Company VAT ID</td><td>       </td><td>       ✓</td><td></td></tr><tr><td>Company Registration Number</td><td></td><td>       ✓</td><td></td></tr><tr><td>Preferred Payment Channel</td><td></td><td>       ✓</td><td></td></tr><tr><td>Company Email</td><td>       ✓</td><td></td><td>All the Inspection/Check reports will be received on  </td></tr><tr><td>Company Address</td><td></td><td>       ✓</td><td></td></tr><tr><td>Add main phone number</td><td></td><td>       ✓</td><td></td></tr><tr><td>Company Website</td><td></td><td>       ✓</td><td></td></tr><tr><td>Company Tax ID</td><td></td><td>       ✓</td><td></td></tr><tr><td>Preferred Language</td><td></td><td>       ✓</td><td></td></tr></tbody></table>

#### 2) "Save Changes" at the last.


# Primary Contact Details

#### 1) Click on " Primary Contact Details".

<figure><img src="/files/4I5kTTUTVZoiRQYIU5Gc" alt=""><figcaption></figcaption></figure>

<table><thead><tr><th width="213">Field Name</th><th width="125">Mandatory</th><th width="118">Optional</th><th>Description</th></tr></thead><tbody><tr><td>Contact Name</td><td>       ✓</td><td></td><td></td></tr><tr><td>Contact Phone Number</td><td></td><td>       ✓</td><td></td></tr><tr><td>Contact Type</td><td></td><td>       ✓</td><td></td></tr><tr><td>Preferred Language</td><td></td><td>       ✓</td><td></td></tr><tr><td>Contact Email</td><td>       ✓</td><td></td><td></td></tr><tr><td>Contact Address</td><td></td><td>       ✓</td><td></td></tr><tr><td>Company Name</td><td></td><td>       ✓</td><td></td></tr></tbody></table>

#### 2) "Save Changes" at the last.


# User Roles

<figure><img src="/files/eNpmvd3XoiYMXEAkgDFE" alt=""><figcaption></figcaption></figure>


# Stage

#### 1) Click on  "Stage" the " Add New Satge".

<figure><img src="/files/JrvswwrsLSP04P2bgGF5" alt=""><figcaption></figcaption></figure>

#### 2) Add Stage Name and " Save Changes".

<figure><img src="/files/M2I6BajqpXPW3ofBcCU7" alt=""><figcaption></figcaption></figure>


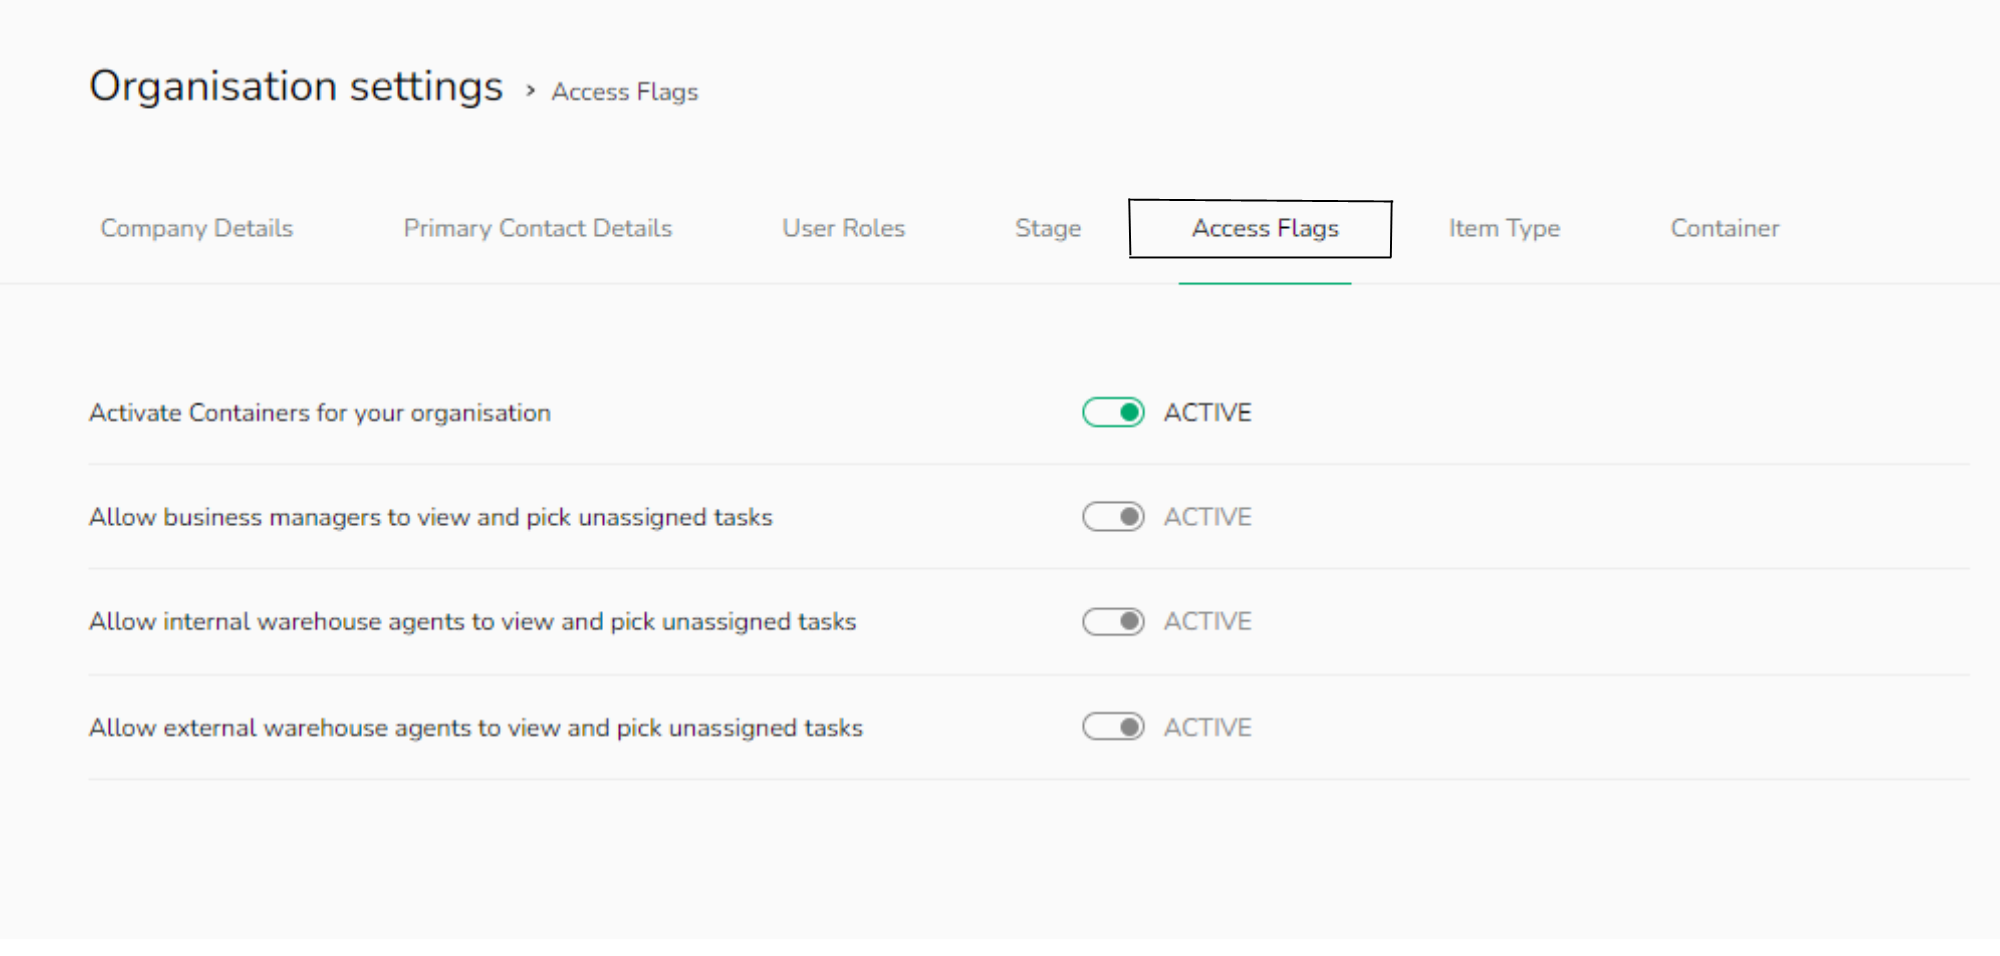
# Access Flags

#### 1) Click on Access Flags.

<figure><img src="/files/qbYZ1KWRB05Qr8feLS93" alt=""><figcaption></figcaption></figure>


# Item Type

#### 1) Click On "Item Type".

<figure><img src="/files/LutKdFIHDz2WkSFV2QNG" alt=""><figcaption></figcaption></figure>

<figure><img src="/files/dEHUeDdHfNCAreTsoBnb" alt=""><figcaption></figcaption></figure>

<table><thead><tr><th width="213">Field Name</th><th width="125">Mandatory</th><th width="118">Optional</th><th>Description</th></tr></thead><tbody><tr><td>Item Type Name</td><td></td><td></td><td></td></tr><tr><td>Item Type Status</td><td></td><td></td><td></td></tr><tr><td>Upload Item Type Default Icon</td><td></td><td></td><td></td></tr><tr><td>Upload Item Type Layout Vectors</td><td></td><td></td><td></td></tr><tr><td>Item fields for standard details</td><td></td><td></td><td></td></tr><tr><td>Item fields for inspection details</td><td></td><td></td><td></td></tr></tbody></table>

#### "Save Changes" at the last.


# Container

<figure><img src="/files/ufxkclgbxUlP8nveSG0t" alt=""><figcaption></figcaption></figure>

#### 1) Click on " Container".

<table><thead><tr><th width="213">Field Name</th><th width="125">Mandatory</th><th width="118">Optional</th><th>Description</th></tr></thead><tbody><tr><td>Upload default container Icon</td><td></td><td></td><td></td></tr><tr><td>Upload layout container vectors</td><td></td><td></td><td></td></tr><tr><td>Container fields for standard details</td><td></td><td></td><td></td></tr><tr><td>Container fields for inspection details</td><td></td><td></td><td></td></tr></tbody></table>

#### 2) " Save Changes" at the last.


# Members

<figure><img src="/files/anG1kwBbw4KCmpNC7tQI" alt=""><figcaption></figcaption></figure>

1\) Click on "Members".

#### Additional Functionality: &#x20;

&#x20;1.[ How to add a new member](/setting-up-your-emory-account/members/add-new-member)&#x20;

2\. [Batch Upload Member Data](/setting-up-your-emory-account/members/batch-upload-member-data)&#x20;


# Add new member

#### 1) Click on " Add New Member".

<figure><img src="/files/gnNol82619isHRz7hrN4" alt=""><figcaption></figcaption></figure>

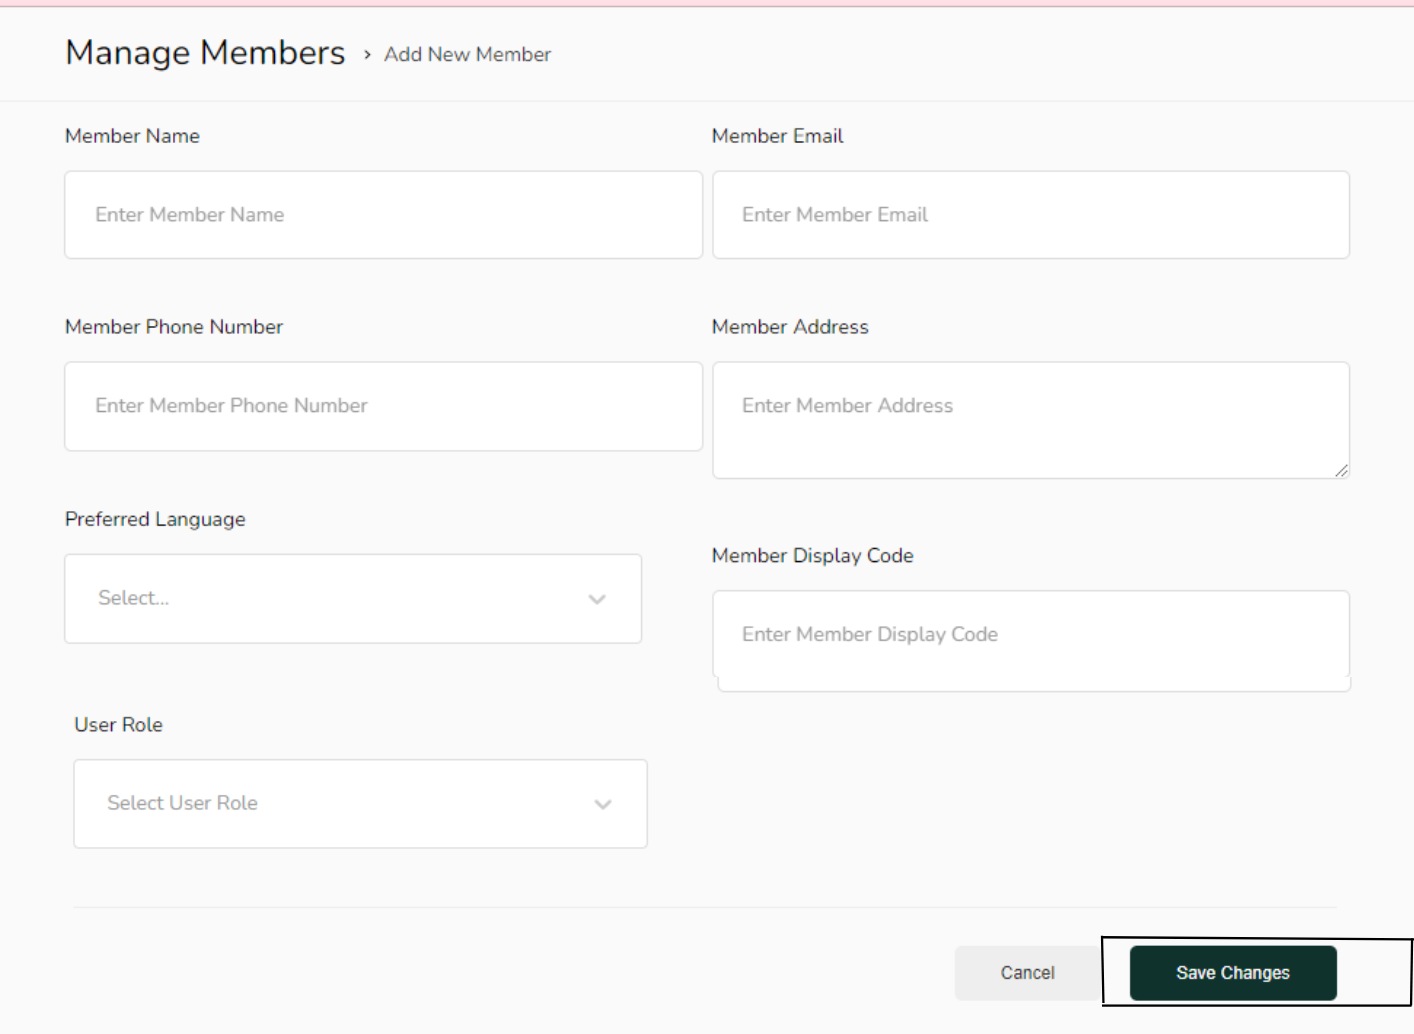
#### 2) Fill up all the below details.

<figure><img src="/files/PrhPHHuU1MJMNiRdblS4" alt=""><figcaption></figcaption></figure>

<table><thead><tr><th width="213">Field Name</th><th width="115">Mandatory</th><th width="108">Optional</th><th>Description</th></tr></thead><tbody><tr><td>Member Name </td><td>       ✓</td><td></td><td>Add the full name of the member</td></tr><tr><td>Member Phone Number</td><td>       ✓</td><td></td><td>Supports ....digits </td></tr><tr><td>Preferred Language</td><td>       ✓</td><td></td><td>Currently supporting English and German</td></tr><tr><td>User Role</td><td>       ✓</td><td></td><td>Add the appropriate role from the "roles" section</td></tr><tr><td>Member Email</td><td>       ✓</td><td></td><td></td></tr><tr><td>Member Address</td><td>       ✓</td><td></td><td></td></tr><tr><td>Member Display Code</td><td>       ✓</td><td></td><td></td></tr></tbody></table>

#### 3) "Save Changes" at the last.


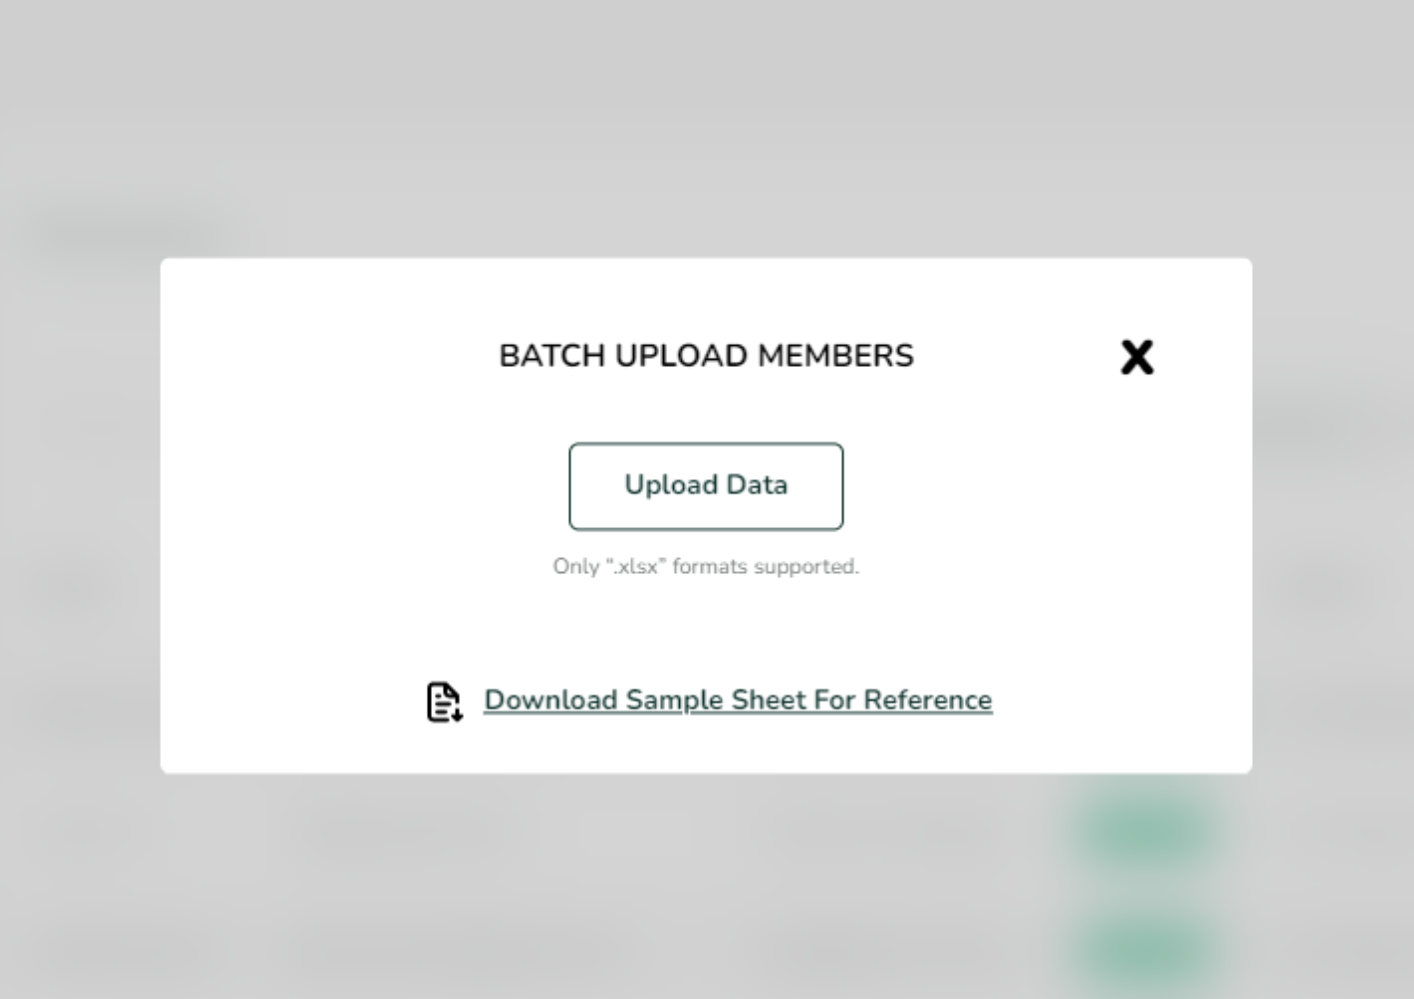
# Batch Upload Member Data

#### You can upload all the in the batch as well.

<figure><img src="/files/QloZLZEytS2jkqm7E0Ny" alt=""><figcaption></figcaption></figure>

{% file src="/files/Voph2AajzTAwpQnOp2hx" %}
Sample format for batch upload
{% endfile %}

If you have a lot of&#x20;


# Operational settings


# Containers

#### 1) Click on "Containers".

<figure><img src="/files/tVVFjim1bXdag32avQiO" alt=""><figcaption></figcaption></figure>

#### 2). Click on add new container.

<figure><img src="/files/TNNv6lbh07z2MNcCxmsd" alt=""><figcaption></figcaption></figure>

#### 3). Enter all the required details.

<figure><img src="/files/b1PoPBBYkrw95V1POrcu" alt=""><figcaption></figcaption></figure>

<table><thead><tr><th width="213">Field Name</th><th width="125">Mandatory</th><th width="118">Optional</th><th>Description</th></tr></thead><tbody><tr><td>Title</td><td>       ✓</td><td></td><td></td></tr><tr><td>Container ID</td><td>       ✓</td><td></td><td></td></tr><tr><td>Destination</td><td></td><td>       ✓</td><td></td></tr><tr><td>Departure Date</td><td></td><td>       ✓</td><td></td></tr><tr><td>Description</td><td></td><td>       ✓</td><td></td></tr><tr><td>Source</td><td></td><td>       ✓</td><td></td></tr><tr><td>Yard Location</td><td></td><td>       ✓</td><td></td></tr><tr><td>Arrival Date</td><td></td><td>       ✓</td><td></td></tr></tbody></table>

#### 4) Click on  " Create Container " at the last.

#### 5) Download QR Codes for easy interactions.

<figure><img src="/files/QWqixUS9QtbUX5eAueqS" alt=""><figcaption></figcaption></figure>

**Note:** Both Items/Containers are automatically Archived after 2 months of item creation/last check report generated. Unarchive is paid. Contact Emory support team to Unarchive


# Items

#### 1) Click on "Items"

<figure><img src="/files/hhVXrGlibd8vh4n2Jp5A" alt=""><figcaption></figcaption></figure>

#### 2) "Add New Item"

<figure><img src="/files/x2aX0U3KtUlolRBsuY6c" alt=""><figcaption></figcaption></figure>

#### 3) Add all the below required details.

<figure><img src="/files/HmMZdZfRlGlts5rzg6Gr" alt=""><figcaption></figcaption></figure>

<table><thead><tr><th width="213">Field Name</th><th width="125">Mandatory</th><th width="118">Optional</th><th>Description</th></tr></thead><tbody><tr><td>Title</td><td>       ✓</td><td></td><td></td></tr><tr><td>Description</td><td></td><td>       ✓</td><td></td></tr><tr><td>Customer Emai</td><td></td><td>       ✓</td><td></td></tr><tr><td>Mark Number</td><td>       ✓</td><td></td><td>Item ID </td></tr><tr><td>Item Type</td><td>       ✓</td><td></td><td></td></tr><tr><td>Location</td><td></td><td>       ✓</td><td></td></tr><tr><td>Arrival Date</td><td></td><td>       ✓</td><td></td></tr><tr><td>Item Image</td><td></td><td>       ✓</td><td></td></tr><tr><td>Container</td><td></td><td>       ✓</td><td></td></tr><tr><td>Stage</td><td></td><td>       ✓</td><td></td></tr></tbody></table>

#### 4) "Create Item" at the last.

#### 5) Download QR codes for easy interactions.

<figure><img src="/files/HSfnouNQdQBLEUAiSrin" alt=""><figcaption></figcaption></figure>

**Note:** Both Items/Containers are automatically Archived after 2 months of item creation/last check report generated. Unarchive is paid. Contact the Emory support team to Unarchive


# Inspection process

Once we set up the account, follow the following steps-

1. Using *<mark style="color:green;">Webapp</mark>*, Ensure Item/ container is there in the system. Assign it to the right field agent.
2. Using *<mark style="color:green;">Mobile</mark>*, scan QR code/ search the item to be inspected.
3. Start the inspection process
4. Edit details
5. Add markings
6. Add photos & comment
7. Create check report


# Roles

org Admin  - Features - Who this person is - What you can achieve with this role - How can you utilize the features/role.

<table><thead><tr><th width="171">Admin</th><th>What you can achieve with this role</th></tr></thead><tbody><tr><td>Emory Rep. : Representative from Emory</td><td>Set up your Emory account, configuration (item types, member roles, stages, etc.), troubleshooting,  evaluation of new feature request</td></tr><tr><td>Organisation Admin:<br>CEO/Team-lead</td><td><p><em><mark style="color:green;"><strong>Access to:</strong></mark></em><mark style="color:green;"> Webapp, Mobile app</mark><br></p><p><strong>Initial Set up:</strong></p><p>First time set up of <a href="/pages/Dbn27WaeFpYWR7F3QjvH">Emory app account</a> for the company.</p><p></p><p>Modify configurations - </p><ul><li>Create or change (name, order, and data types for item fields) Item types &#x26; Layout Vector </li><li>Enable/Disable containers</li><li>Stage values: Customizable drop-down field which can be used to define the steps in your workflow. Eg Inbound, Outbound, In-process, Done</li></ul><p>Create, Update, and Deactivate the items/containers</p><p></p><p>Assign roles to each/new member. Create/update their profiles.</p><p></p><p><strong>Operations:</strong></p><p>Assign items/containers to each member.</p><p></p><p>Has an overview of day-to-day <a href="/pages/xbiYpy9GUQZRoXWkjxuV">operations</a></p><p></p><p>Review the inspection report. </p><p></p><p><strong>Business Development:</strong> <br>Have access to the Statistics on the dashboard</p><p>Access to the statistical and billing section</p></td></tr><tr><td>Warehouse Admin: Manages the in-flow and out-flow of all the goods</td><td><p><em><mark style="color:green;"><strong>Access to:</strong></mark></em><mark style="color:green;"> Webapp, Mobile app</mark><br></p><p><strong>Data setup/import:</strong> </p><p>Create, maintain, assign Items/Containers</p><p>Associate Items to a Container.<br><br>Import containers/Batch upload (MS-Excel, API)</p><p>Import Items/Batch upload (MS-Excel, API)</p><p></p><p><strong>Assignment:</strong></p><p>Assign Items/Containers to the right field agent<br>Create QR codes, assign them, print QR stickers.</p><p>Additional configuration - Automatically share the report once created</p><p></p><p><strong>During inspection:</strong></p><p>-Edit details</p><p>-Add markings (dent/scratch..)</p><p>-Add photos &#x26; comment</p><p>Assign Items/Containers to the field agents</p><p></p><p><strong>After inspection:</strong></p><p>Check inspection status <br>Create, update, and verify inspection reports.</p><p>Create multiple check reports of Items/Containers in order to track changes over time.</p><p>Share reports with the customer via WhatsApp, SMS, and email. </p></td></tr><tr><td>Senior Field Agent: Inspects the vehicle</td><td><p><em><mark style="color:green;"><strong>Access to:</strong></mark></em><mark style="color:green;"> Webapp, Mobile app</mark><br></p><p>Update their own profile</p><p></p><p><strong>Data setup/import:</strong> </p><p>Create, and maintain Items/Containers</p><p>Associate Items to a Container.<br><br>Import containers/Batch upload (MS-Excel, API)</p><p>Import Items/Batch upload (MS-Excel, API)</p><p></p><p><strong>Assignment:</strong></p><p>Assign Items/Containers via web app to the right field agent<br>Access/download QR codes, assign them, and print QR stickers.</p><p></p><p><strong>During inspection:</strong></p><p>-Edit details</p><p>-Add markings (dent/scratch..)</p><p>-Add photos &#x26; comment</p><p>Submit Inspection with signature and timestamp<br></p><p><strong>After inspection:</strong></p><p>Check inspection status <br>Create, update, and verify inspection reports.</p><p>Create multiple check reports of Items/Containers in order to track changes over time.</p><p>Share inspection reports with the customer via WhatsApp, SMS, and email. </p><p></p></td></tr><tr><td>Internal Field Agent: Inspects the vehicle</td><td><p><em><mark style="color:green;"><strong>Access to:</strong></mark></em><mark style="color:green;"> Mobile app</mark></p><p></p><p>Update their own profile</p><p></p><p><strong>Access:</strong> </p><p>Scan any QR code via the mobile app</p><p>Access to Items/Containers via scanning the QR code</p><p>Edit the inspection report</p><p></p><p><strong>During inspection:</strong></p><p>-Edit details</p><p>-Add markings (dent/scratch..)</p><p>-Add photos &#x26; comment</p><p>Submit Inspection with signature and timestamp<br></p><p><strong>After inspection:</strong></p><p>Check inspection status <br>Create, update, and verify inspection reports.</p><p>Create multiple check reports of Items/Containers in order to track changes over time.</p><p>Share reports with the customer via WhatsApp, SMS, and email</p></td></tr><tr><td>External Field Agent: Intern, Temporary employee, payroll,  Contractor etc</td><td><p><em><mark style="color:green;"><strong>Access to:</strong></mark></em><mark style="color:green;"> Mobile app</mark></p><p></p><p>Update their own profile via Mobile app</p><p></p><p><strong>Access:</strong> </p><p>Scan any QR code via mobile app</p><p>Access to Items/Containers via scanning the QR code</p><p>Edit the inspection report</p><p></p><p><strong>During inspection:</strong></p><p>-Edit details</p><p>-Add markings (dent/scratch..)</p><p>-Add photos &#x26; comment</p><p>Submit Inspection for review with signature and timestamp<br></p><p><strong>After inspection:</strong></p><p>Check inspection status <br>Create, update, inspection reports.</p><p>Create multiple check reports of Items/Containers in order to track changes over time.</p><p>Share reports with the customer via WhatsApp, SMS, and email</p></td></tr><tr><td>Client: Owns the good/shipment</td><td>Receive the inspection report on their registered email id</td></tr></tbody></table>

<br>


# Inspection Statistics

Emory Pro [digital inspection app ](https://emory.pro/)helps teams streamline the inspection process, improve data accuracy, and make data-driven decisions. The built-in inspection dashboard provides real-time inspection statistics, inspection analytics, and inspection data tracking inside an easy-to-use inspection management system.

Checked vs Non-Checked Items

<figure><img src="/files/wIV2jwzfGX1x6OFm9DAT" alt=""><figcaption></figcaption></figure>

Assigned vs Unassigned Items

No of Items & Check Reports Generated weekly

<figure><img src="/files/eLZaflkO5r7EowYzzaQn" alt=""><figcaption></figcaption></figure>

Billing<br>

<figure><img src="/files/htZDZZs33PAZYQZmdj8Z" alt=""><figcaption></figcaption></figure>


# FAQ

<details>

<summary>I forgot my password. What should I do?</summary>

On the login page, click on forgot password. Add your email id which you had used for sign in earlier.&#x20;

You will get a password reset link in your inbox. Open the link and reset the password. The link is only valid for 4 hours.&#x20;

</details>

<details>

<summary>I did not receive the password resetting link on my email id. What should I do now?</summary>

Reach out to your team head and inform the same. The person who is the "Organization Admin" in your company can send you the password resetting link by following these steps. Go to the dashboard > click on "Members" on the left side > click on "Send Password reset link" for the respective member who needs to access it.&#x20;

</details>

<details>

<summary>How can I batch-upload data?</summary>

You can batch-upload the data for adding a list of Items/Containers/Members via an Excel sheet.  For each of these batch uploads, click on the bach-upload button on their respective pages. A pop-up window will appear, download the sample template of the Excel sheet. Fill the sheet as the samples and upload it.\
You will find the reflected data in the list view in their respective sections.\
\
**Note:** While batch-uploading the Coninter Id and title should not be missing.

</details>

<details>

<summary>Batch Upload: Can I add duplicate items, existing container, leave container empty etc</summary>

**Batch upload Item:** If you have to add an item - it is tied to an item, then specify the container id. This container id can be a new id or an earlier id. &#x20;

**Batch upload Container:** Items can be duplicated. \
container title you can leave blank,&#x20;

</details>

<details>

<summary>What should I do if the app is unresponsive after I clicked on "create check report"?</summary>

Wait for a minute for the app to respond.

If that still doesn't work, then close & restart the app. Check the status of the inspection report, and take the action accordingly.

</details>

<details>

<summary>What steps should I take if some photos are not showing up?</summary>

Close and restart the app, and check if the photos appear. \
If not then logout and login the app.

</details>

<details>

<summary>Is there a solution for the app taking an extended amount of time to process photos?</summary>

</details>

<details>

<summary>The digital inspection report is lacking a signature.</summary>

Wait for the signature to re-appear and then continue with the inspection report

</details>

<details>

<summary>The app screen is taking an excessive amount of time to load on the app. <br>Or if the App is taking too long to start. </summary>

Logout and login and then restart the app. It should be working fast

</details>

<details>

<summary>What is the process for contacting the Emory support team?</summary>

You can write an email to <info@emory.pro> and we will get back to you at the earliest.&#x20;

</details>


# Contact Us

If you have questions, need assistance, or encounter any issues while using Emory Pro, our support team is here to help.

### **How to Reach Us:**

* 📧 **Email Support:** <info@emorypro.com>
* 🌐 **Help form:** [Contact Us](https://emory.pro/contact-us/)
* 📞 **Phone Support:** +49 471 9021750 (Mon–Fri, 8:00 AM – 5:00 PM CET)

### **When to Contact Us:**

* Technical issues or troubleshooting
* Guidance on using features
* Feedback or suggestions
* Account and billing inquiries

We strive to respond within **24 hours** on business days.<br>


# Emory Pro Overview

Learn what Emory Pro is, how it works, and how teams use it to manage digital inspections, evidence, reports, and handovers from one platform.

[Emory.Pro](https://emory.pro/) is an operational inspection platform for teams managing Assets, Vehicles, Cargo, Equipment and Handovers.

It replaces WhatsApp Photos, Paper Forms, Excel Sheets and Manual reports with one mobile-first system for Digital Inspection, Damage Documentation, Handover Reports and Accountability.\
With Emory Pro, teams can scan assets, capture photos and videos, mark damage, complete inspection checklists , and generate professional reports in seconds — on mobile or web, even offline.

Inspection data is stored securely, synced automatically, and can be shared with stakeholders through digital [reports](https://www.webapp.emory.pro/cr/c195749940fb7d3c), automated emails, or the Emory API.


# What is Emory Pro -

Emory Pro helps operations teams inspect assets, document damage, generate reports, and track asset history from one platform.

With Emory Pro, teams can:

* Perform digital inspections on mobile or tablet
* Capture Photos, Videos, Comments, and Documents
* Annotate damage directly on photos (Photo Doodle)
* Add Damage Markings on Asset Blueprints
* Capture digital signatures during handovers
* Generate PDF inspection reports instantly
* Track the full history of every asset
* Scan QR codes, Barcodes, VINs, or Asset IDs
* Work fully offline and sync automatically when connectivity is restored
* Monitor assets, reports, and inspection status from the web dashboard

Emory Pro is designed for real operational environments where teams work in yards, warehouses, depots, ports, workshops, customer sites, and field locations.


# The problem Emory Pro solves -

In many operations, inspection evidence is fragmented.\
Photos are stored in WhatsApp.\
Forms are completed on paper.\
Reports are created manually in Excel. \
Damage is noted in text without photos, timestamps, or location data.\
Handover records are incomplete, unsigned, or difficult to trace.

When something goes wrong, teams often struggle to answer simple questions: \
&#x20; **Who inspected this asset?**\
&#x20; **What was its condition before handover?**\
&#x20; **When was the damage recorded?**\
&#x20; **Where is the photo evidence?**\
&#x20; **Who accepted the asset?**\
&#x20; **Which report should we trust?**

Emory Pro brings all Inspection Data, Media, Signatures, Reports, and Asset history into one structured system. This helps teams reduce disputes, improve accountability, and create a single source of truth for every asset.

{% embed url="<https://emory.pro/features/>" %}


# How Emory Pro Works -

A typical Emory Pro workflow starts with an asset. The user identifies the asset by scanning a QR code, Barcode, VIN, asset ID, or by selecting it from the asset list. The inspection flow is based on the asset type and inspection type configured by the organisation. This means each workflow can be adapted to the way your business operates, without developer involvement.

During the inspection, the user can fill in structured fields, capture photos and videos, add comments, add Damage Markings on photos or Asset Blueprints, and collect signatures if required. Once the inspection is completed, Emory Pro generates an Inspection Report, available as a PDF and a secure digital link.

Every completed inspection becomes part of the asset’s history.

**Mobile App and Web App** Emory Pro is used across two main interfaces.\
\
**Mobile app** The mobile app is used by field teams, inspectors, drivers, warehouse workers, logistics teams, subcontractors, and external partners. It is used to:

* Start and complete inspections
* Scan assets
* Capture photos, videos, and documents
* Add damage markings
* Work offline
* Complete assigned tasks
* Sync inspection data once connectivity returns

The mobile app is available for [IOS](https://apps.apple.com/de/app/emory-pro/id6443503759) and [Android](https://play.google.com/store/apps/details?id=pro.emory.inspections\&gl=DE\&pli=1). The mobile app supports full offline functionality, including access to the complete asset inventory, inspection completion, and media capture. Data syncs automatically when connectivity is restored.

[**Web App**](https://www.webapp.emory.pro/login) The web platform is used by administrators, office teams, supervisors, and managers. It is used to:

* Manage assets and containers
* Configure inspection workflows and checklists
* Create users and roles
* Review inspection reports
* Monitor asset status
* Track inspection activity
* Manage operational settings
* View dashboards and statistics

Together, the mobile app and web platform help field and office teams work from the same operational data.


# Key Concepts

#### Assets

Assets are the primary objects that are inspected, tracked, managed, or handed over in Emory Pro.\
An asset can represent a vehicle, trailer, machine, forklift, pallet, equipment, unit, room, or any other operational object your team needs to manage.\
Each asset can store its own details, inspection history, reports, media evidence, lifecycle stage, and linked containers.

#### Containers

Containers help organize assets into physical or logical groups.\
A container can represent a shipment, project, warehouse zone, tower, floor, batch, rack, or operational folder.\
One container can include multiple assets, and one asset can also be linked to multiple containers. This allows teams to create flexible hierarchies, visualize relationships, and navigate easily between connected assets.

#### Asset Types

Asset Types define the structure and configuration of different asset categories.\
Examples include:

* Vehicle
* Forklift
* Trailer
* Machine
* Equipment

Each Asset Type can have its own fields, inspection requirements, asset blueprints, layouts, and configuration rules.

#### Inspection Types

Inspection Types define the purpose or scenario of an inspection.\
Examples include:

* Check-In
* Check-Out
* Handover
* Damage Inspection
* Delivery Inspection
* Return Inspection
* Daily Check
* Quality Check

The combination of **Asset Type + Inspection Type** determines the inspection fields, required inputs, workflow logic, validation rules, and report output.

#### Reports

Reports are automatically generated once an inspection is completed.\
A report may include:

* Asset details
* Inspection results
* Photos and videos
* Damage markings
* Comments
* Timestamps
* User information
* Digital signatures
* Handover proof

Reports can be accessed through a digital link or downloaded as PDF files for internal records, customer communication, claims, audits, or handover documentation.

#### Tasks

Tasks help teams assign, manage, and track follow-up actions.\
A task can be created when damage is identified, equipment is missing, additional verification is required, or another team member needs to take action.\
Assigned users receive notifications and can complete the task by adding comments, photos, videos, documents, or other supporting evidence.

{% embed url="<https://emory.pro/platform/reporting-outputs/>" %}


# Why Teams Use Emory Pro

Teams use Emory Pro to reduce manual work, improve inspection quality, and create reliable operational evidence during inspections, handovers, and asset movements.

Key benefits include:

* Reduced paperwork and manual reporting
* Fewer missing photos, incomplete forms, and lost records
* Faster and more consistent inspections
* Clearer damage documentation
* Stronger handover proof with timestamps and signatures
* Better protection in case of disputes or claims
* Complete asset history in one central system
* Easier collaboration between internal teams, external partners, and customers
* Reliable offline work in low-connectivity environments
* Central visibility across locations, teams, and workflows

#### What Makes Emory Pro Different -:

Emory Pro is not a generic form or checklist tool. It is built for operational teams that need fast, visual, and reliable evidence for assets, inspections, and handovers.

#### Photo Annotation -:

Users can draw, circle, and annotate directly on damage photos. This makes visual evidence easier to understand and reduces ambiguity compared to text-only descriptions.

#### Offline Inspections at Scale -:

The mobile app supports large active inventories offline, allowing field teams to continue working even without internet access. Once connectivity returns, inspection data syncs automatically.

#### Damage Markings on Asset Blueprints -:

Teams can place damage markings on predefined asset blueprints, creating structured and precise visual documentation for vehicles, equipment, containers, units, or other asset types.

#### Handover Accountability -:

Digital signatures, timestamps, media evidence, user details, and inspection history help create a clear chain of custody across every handover.

#### Configurable Workflows -:

Organizations can configure asset types, inspection types, fields, lifecycle stages, and report outputs without developer support. This allows Emory Pro to adapt to different operational processes.

#### Web and Mobile Platform -:

Field teams complete inspections from the mobile app, while office teams, supervisors, and administrators manage workflows, users, reports, and dashboards from the web platform.


# Getting Started

Set up your organisation in Emory Pro and prepare your team to start digital inspections.

This section guides you through the recommended setup process, from creating your organisation profile to running your first test inspection. Most teams can complete the initial setup in under two hours and perform their first real inspection on the same day.

### What you’ll need

Before you begin, make sure you have:

* Administrator access to your Emory Pro account
* Your company name and contact details
* A rough idea of the asset types and inspection types you want to configure
* A list of team members who need access
* Any existing asset data you want to upload, such as an Excel or CSV file

You do not need to have everything finalized before starting. Emory Pro is flexible, so you can add more users, assets, workflows, fields, and settings later.

### What to do next

Work through the following pages in order:

#### 1. Setup Overview

Understand the full setup process, the recommended order, the setup checklist, and the difference between admin and field user responsibilities.

#### 2. Create Your Organisation&#x20;

Add your company details, logo, primary contact, and organisation-level settings.

#### 3. Set Up Asset Types&#x20;

Define the structure, fields, and Asset Blueprints for each type of asset your team manages.

#### 4. Set Up Inspection Types&#x20;

Create inspection workflows for scenarios such as Check-In, Check-Out, Handover, Daily Check, Damage Inspection, and Quality Check.

#### 5. Set Up Lifecycle Stages

Define how assets move through your operation, for example from Inbound to Inspection, Storage, Outbound, Delivered, or Archived.

#### 6. Add or Import Assets&#x20;

Create assets manually, upload them in bulk using a spreadsheet, or import them through the Emory Pro API.

#### 7. Set Up Roles & Permissions&#x20;

Control what each user can see and do across assets, inspections, reports, tasks, and organisation settings.

#### 8. Invite Team Members&#x20;

Add internal users, external inspectors, subcontractors, partners, or customers who need access to Emory Pro.

#### 9. Install and Log In to the Mobile App

Prepare field users to complete inspections on [IOS](https://apps.apple.com/de/app/emory-pro/id6443503759) or [Android](https://play.google.com/store/apps/details?id=pro.emory.inspections\&gl=DE\&pli=1) devices, including offline inspection workflows.

#### 10. Run Your First Test Inspection

Validate your setup by completing a test inspection, capturing evidence, generating a report, and reviewing the final output.

### Need help?

If you need support during setup, contact us at <support@emory.pro>.


# Setup Overview

Everything you need to know before configuring Emory Pro for your organisation.

***

<figure><img src="/files/lQVEBYuQHZe7W3h4R5GO" alt=""><figcaption></figcaption></figure>

This page explains the recommended setup order, the difference between administrator setup and field usage, and the key concepts you should understand before going live.

### Recommended setup order

Complete the setup steps in the order below. Each step builds on the previous one, so following this sequence will help you save time and avoid unnecessary rework later.

<table><thead><tr><th width="88.8828125" align="center">Step</th><th width="346.1484375">Action</th></tr></thead><tbody><tr><td align="center">1</td><td>Create your organisation</td></tr><tr><td align="center">2</td><td>Complete company and contact details</td></tr><tr><td align="center">3</td><td>Set up Asset Types</td></tr><tr><td align="center">4</td><td>Set up Inspection Types</td></tr><tr><td align="center">5</td><td>Define Lifecycle Stages</td></tr><tr><td align="center">6</td><td>Add or import assets</td></tr><tr><td align="center">7</td><td>Set up Roles &#x26; Permissions</td></tr><tr><td align="center">8</td><td>Invite team members</td></tr><tr><td align="center">9</td><td>Install and log in to the mobile app</td></tr><tr><td align="center">10</td><td>Run your first test inspection</td></tr></tbody></table>

### Admin setup vs field usage

Emory Pro is used across two main interfaces: the web platform and the mobile app.

The initial configuration is completed by an administrator in the web platform. Once the setup is ready and tested, field users can start using the mobile app to complete inspections.

#### Administrators use the web platform to:

* Manage organisation settings and branding
* Configure Asset Types and Inspection Types
* Define Lifecycle Stages
* Add or import assets
* Create and manage Groups
* Set up roles and permissions
* Invite and manage users
* Review Inspection Reports
* Monitor activity through dashboards and operational views

#### Field users use the mobile app to:

* Search for or scan assets
* Complete assigned inspections
* Capture photos, videos, comments, and signatures
* Add Damage Markings on photos and Asset Blueprints
* Complete handovers in the field
* Work fully offline when there is no internet connection
* Sync inspection data automatically once connectivity is restored

Field users do not need to be involved in the initial configuration. Invite them once the setup has been completed and tested.

### Start with a simple workflow

For your first setup, keep the configuration focused and simple.

A smaller setup is easier to test, easier to explain to your team, and easier to expand once the first workflow is working correctly.

A good starting point is:

* One organisation
* One administrator
* Two or three field users
* One Asset Type
* One Inspection Type
* A small number of test assets
* One report format

### Example starting workflows

#### Vehicle Check-In

An inspector scans a vehicle QR code, completes a condition checklist, captures photos, adds Damage Markings if required, and generates a Check-In Report.

#### Equipment Handover

An inspector completes a handover checklist, both parties sign on the mobile device, and a signed Handover Report is generated instantly.

Once you have tested one workflow end to end, you can expand your setup with additional Asset Types, Inspection Types, users, Containers, report templates, and integrations.

### How the key concepts connect

Understanding the main building blocks will make the setup process easier.

* **Asset Types** define the structure of the physical objects your team manages, such as Vehicles, Forklifts, Containers, or Equipment.
* **Inspection Types** define the purpose and structure of an inspection, such as Check-In, Check-Out, Handover, Daily Check, or Damage Inspection.
* The combination of **Asset Type + Inspection Type** determines the checklist, fields, workflow logic, and report output for each inspection.
* **Assets** are the individual objects your team inspects. Each asset belongs to an Asset Type.
* **Lifecycle Stages** show where an asset is in your operation, such as Inbound, Active, In Repair, Outbound, or Delivered.
* **Containers** help organise assets into logical groups, such as by location, shipment, project, customer, or batch.
* **Roles** control what each user can see and do across the platform.
* **Inspection Reports** are generated automatically after an inspection is completed. They include inspection fields, media, Damage Markings, signatures, timestamps, and user details.

### Setup checklist

Use this checklist to confirm everything is ready before going live with your team.

<table><thead><tr><th width="301.046875">Setup item</th><th width="95.2578125" align="center">Status</th></tr></thead><tbody><tr><td>Organisation created</td><td align="center">☐</td></tr><tr><td>Company details completed</td><td align="center">☐</td></tr><tr><td>Asset Types configured</td><td align="center">☐</td></tr><tr><td>Inspection Types configured</td><td align="center">☐</td></tr><tr><td>Lifecycle Stages created</td><td align="center">☐</td></tr><tr><td>Assets added or imported</td><td align="center">☐</td></tr><tr><td>Containers created, if required</td><td align="center">☐</td></tr><tr><td>Roles and permissions configured</td><td align="center">☐</td></tr><tr><td>Team members invited</td><td align="center">☐</td></tr><tr><td>Mobile app installed by field users</td><td align="center">☐</td></tr><tr><td>Test inspection completed</td><td align="center">☐</td></tr><tr><td>Test report reviewed</td><td align="center">☐</td></tr><tr><td>Report template confirmed</td><td align="center">☐</td></tr><tr><td>Test report shared with a contact</td><td align="center">☐</td></tr></tbody></table>

### What to expect after setup

Once your setup is complete and your team starts using Emory Pro in the field, you will have:

* A structured record of every inspection, damage finding, and handover
* Full asset history accessible from one scan
* Inspection Reports generated automatically without manual reporting
* A single source of truth for your operational evidence

From this point, the administrator’s role shifts from initial configuration to ongoing management. This includes monitoring activity, reviewing reports, managing users, tracking asset status, and expanding Emory Pro as your operation grows.

### Ready to begin?

Start with **Create Your Organisation**.


# Create Your Organisation

Set up your company workspace in Emory Pro before inviting users or configuring assets.

Your organisation is the central workspace for your company. It contains your users, assets, inspections, reports, and settings. Everything your team creates in Emory Pro belongs to this organisation

### What you will need![](/files/v7M5CxfNKHwyd6ndEZ2h)

Before you begin, prepare:

* Company name
* Company logo
* Primary contact name
* Primary contact email address
* Default language for your organisation

For the logo, use a PNG or JPEG file where possible. Recommended size: **460 × 200 px**.

### Create your account

Go to [Webapp.Signup](https://www.webapp.emory.pro/login) and create your Emory Pro account.

Enter your organisation name and email address. After signing up, you will receive a confirmation email. Open the email, click the verification link, and log in to Emory Pro for the first time.

If your organisation is joining Emory Pro through an enterprise setup, your Emory Pro account manager may create the organisation for you. In that case, you will receive an administrator invitation by email. Open the invitation link, set your credentials, and log in to the platform.

### Complete your organisation details

Once you are logged in, go to **Settings →** [Organisation](https://www.webapp.emory.pro/dashboard/org/core/company-details)

Complete the main organisation details:

#### Organisation Name

Enter your company name as it should appear across Emory Pro, including the web platform, mobile app, and inspection reports.

#### Logo

Upload your company logo.

Your logo may appear in the mobile app header, Inspection Reports, and Handover Reports. For best results, use a high-resolution PNG or JPEG file. A transparent background is recommended where possible.

#### Default language

Select the default language for your organisation.

This language is used across the web platform and mobile app unless a user selects their own preferred language in their profile.

Emory Pro currently supports:

* English
* German
* Spanish
* Polish
* Portuguese

#### Primary contact

Enter the name and email address of the main contact person for your organisation.

This contact may be used for account communication, support, and important setup-related updates.

### What happens next

Your organisation workspace is now ready.

You can now continue with the next setup step: **Set Up Asset Types**.